What your customers will see
The following widget is embedded into your site as an iframe. Choose from a variety of customization parameters to change the design of your screens to fit your brand experience. Click through the screens below and configure the first version of your Flinks Connect widget. Flinks Connect is supported by the following browsers:- Chrome
- Safari
- Firefox
- Opera
- Microsoft Edge
Customize your Flinks Connect widget
The design and functionality of your Flinks Connect screens are controlled by parameters in the iframe URL. Enable (or disable) components by updating the parameters in the URL. Here’s an example:html
Use the most recent version
The latest version of the Flinks Connect design is version t2. Enable this version by adding /v2/ to your iframe URL:Url
Already using version 1?
If you’re an existing customer using version 1, this is still accessible to you without specifying a version.Pass an authorize token
Pass a valid authorize token every time you authenticate. If you are using Flinks Connect, this parameter must be included in your iframe URL.List of customization parameters
The following table lists all customizations you can make to your Flinks Connect widget. Click on each section for more information on adding it to your iframe URL.Enter demo mode for testing purposes
Show our dummy institution, Flinks Capital, as an available institution to select for testing purposes.Flinks Connect
To show Flinks Capital, include
demo=true in your iframe URL:
Url Example
Outbound (oAuth connections)
To test Flinks Capital through the OAuth flow, include
demoOutbound=true in your iframe URL. This routes the demo institution through the OAuth screens. For the full walkthrough, see Simulate an OAuth flow in the Toolbox.
Url Example
Change the language
Flinks Connect supports both English and French, but will display English on all screens by default. When you change the language, all screens, including multi-factor authentication (MFA), will display the new language. To switch all screens to French, use thelanguage parameter.
To use French on your Flinks Connect screens, add language=fr to the iframe URL:
Url Example
Set the color theme
By default, Flinks Connect renders with a light theme. Use thetheme parameter to switch to a dark theme or follow the end user’s OS preference. The setting applies to all widget screens: consent, institution selection, credentials, MFA, account selector, success, errors, upload, and bottom sheets.
light: standard light theme (identical to omitting the parameter).dark: dark theme with inverted palettes and adjusted contrast.system: follows the end user’s OS dark mode preference and switches in real time if it changes.
theme=dark to the iframe URL:
Url Example
Url Example
Customize the page layout
This section lists the page elements you can choose to include in your Flinks Connect integration or forego.Add or remove a ‘Close’ button
Use thecloseEnable parameter to specify if you want to display a ‘Close’ button on your Flinks Connect screens. One is not included by default.
For example, to display a ‘Close’ button, add
closeEnable=true to your iframe URL:
Url Example
Add or remove a ‘Back’ button
Use thebackEnable parameter to specify if you want to display a ‘Back’ button on your Flinks Connect screens. We include this by default, but it can be removed.
For example, to remove the ‘Back’ button from your Flinks Connect screens, add
backEnable=false to your iframe URL:
Url Example
Add or remove the Flinks logo in the header
Use theheaderImgEnable parameter to specify if you want to display the Flinks logo on your Flinks Connect screens. We display it by default, but it can be removed.
For example, to remove the Flinks logo, add
headerImgEnable=false in your iframe URL:
Url Example
Add or remove the header section
Use theheaderEnable parameter to specify if you want to include a header section on your Flinks Connect screens. By default, we display a header section with the Flinks logo and customizable text.
For example, to remove the header section, add
headerEnable=false to your iframe URL:
Url Example
Add or remove a static loading page
Use thestaticLoadingEnable parameter to specify if you want to display a static loading page. We don’t include this by default, but you can choose to add it into your integration.
For example, to display a static loading screen, add
staticLoadingEnable=true to your iframe URL:
Url Example
Add or remove padding
Use theremovePadding parameter to specify if you want to add or remove padding on your Flinks Connect screens. All screens have padding by default, but it can be removed.
For example, to remove padding from the screens, add
removePadding=true to your iframe URL:
Url Example
Customizing the Consent screen
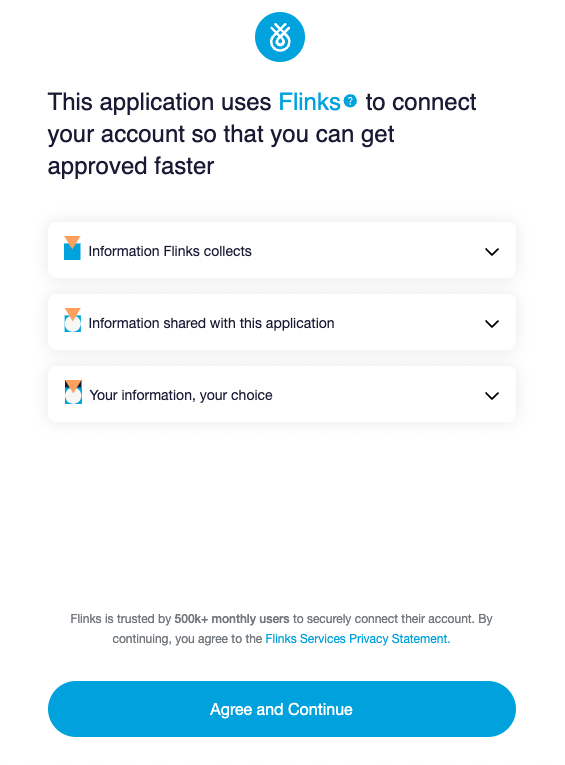
Choose whether or not to display the Consent screen in your Flinks Connect integration and customize various elements on it.Add or remove the Consent screen
Use theconsentEnable parameter to specify if you want to include a Consent screen in your Flinks Connect integration. This screen lists every type of data that the application needs access to, and requires the end-user to provide consent before sharing their financial data. This screen is included in your integration by default, but can be removed.
When enabled (the default), the Consent screen is the first screen the user sees when the widget loads. When disabled, the user lands on the institution list, or directly on the Credential page if you pass an institution id.
For example, to disable the Consent screen, add
consentEnable=false to your iframe URL:
Url Example
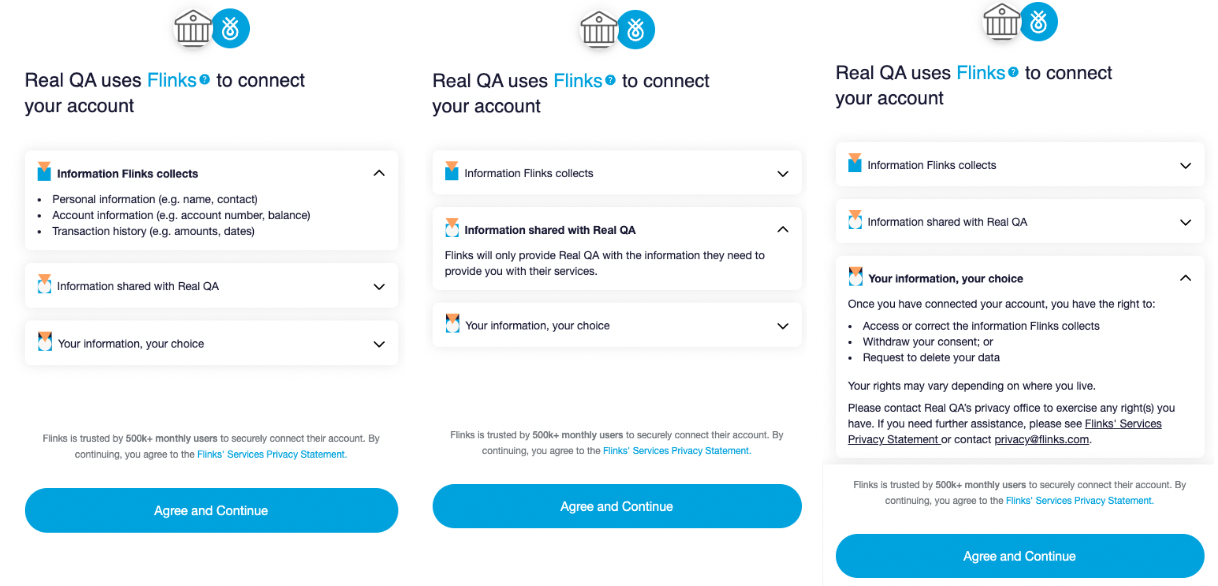
consentTitleAppendedText parameter to change the title on the Consent Screen.
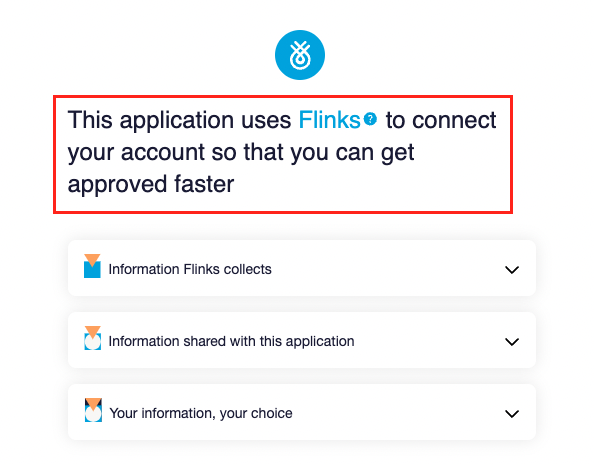
Add your logo to the Consent screen
By default, the Consent Screen displays the Flinks logo at the top of the page, but you can customize the screen by adding your own company logo as well. Here’s what it looks like:Customizing the Institution Login screen
This is how the Institution Login screen looks by default: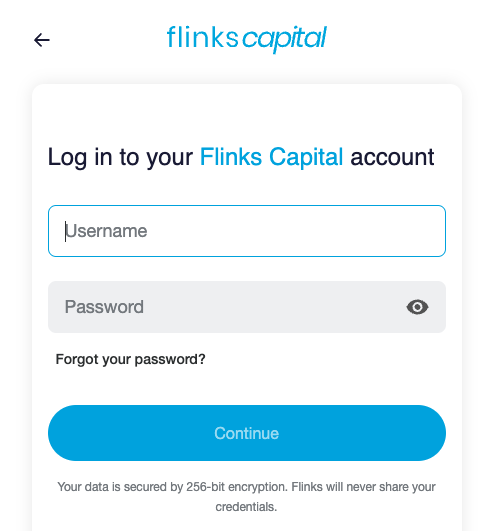
Preselect a specific financial institution
Set up your Flinks Connect integration so that it loads on the login page of a particular financial institution, skipping the Financial Institution Selection screen. There are two ways you can do this:- By institution ID
- By routing number
Preselect by Institution ID
- Determine the ID of the financial institution you want to preselect using the /Institutions endpoint.
- Update your iframe URL with the following structure:
https://[iframe-instance]/Credential/[Institution-ID]
Credential/20 to your iframe URL:
Url Example
Preselect by routing number
This option is only available for certain US financial institutions. For a full list of available routing numbers, call the Institutions API.- If the financial institution you want to preselect is US-based, determine if the routing number is supported by calling the /Institutions endpoint.
-
Update your iframe URL with the following structure:
Url
Url Example
Add or remove term and conditions
Terms and conditions
If the end user has not accepted your service’s terms and conditions in a previous step, you will need to add them on the institution Login Page. You can do so using the following parameters:
-
termsUrl: display the URL of your service terms, so your user can access them from the Institution Login Page. -
termsNoCheckbox=true: if set, this parameter will remove the checkbox but still show the terms and conditions text. -
customerName: display name of your company. It appears on the Consent screen, on the Institution Login Page terms sentence (whentermsUrlis set), and on the Success page. -
termsTextPreLink: text displayed in the terms and conditions before the link. -
termsTextLink: text displayed in the terms and conditions link. -
termsTextPostLink: text displayed in the terms and conditions after the link.
Enhanced Multi-factor Authentication (Deprecated)
Redirect (mandatory for OAuth connectivity)
Flinks Connect will redirect the end user to a landing page once their account is successfully connected.
We recommend setting the Redirect URL to your custom landing page, which can be a Thank You page or a landing page specific to the next step in your process. Any parameters you have specified in your landing page URL must be encoded.
If the parameter
redirectUrl is not specified, a generic thank you page will be displayed.
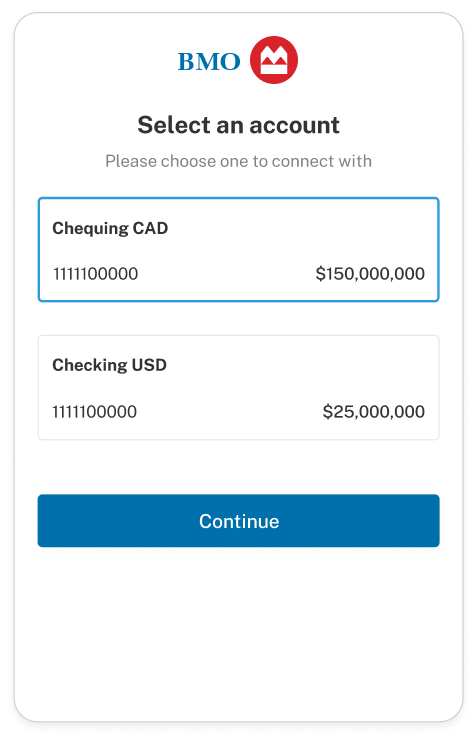
Account Selection
Add the parameter
accountSelectorEnable=true to enable the Account Selection feature in Flinks Connect.
After a successful authorization with the financial institution, Flinks Connect will prompt to the end user a summary of operations accounts that are eligible for Electronic Funds Transfer (EFT).
If you want to present your end user all operations accounts, even those not eligible for EFT, use the parameter showAllOperationsAccounts=true.
accountSelectorNoTitle=true, and any other desired copy can be added just before your iframe.
Example of the redirected URL when the Account Selector is enabled:
Shell
Json
Display all account
To display accounts from all categories for selection, including the ones that are not eligible for transfers (EFT), use the parametershowAllAccounts=true.
Note that when this parameter is used, other operation accounts filters such as eftEligibleRatio and showAllOperationAccounts are ignored.
Multiple selection
By default, only a single account can be selected. In order to enable multiple accounts to be selected, the parameteraccountSelectorMultiple=true needs to be set.
Example of a redirected URL when multiple accounts are selected:
Shell
Json
AccountId of the selected account is going to be included in the redirected URL and the Event Listener, along with the loginId.
Preserve account selection across Reconnect sessions
UseresumeSelectedAccounts to carry an end user’s previously selected accounts into a Reconnect session. Flinks Connect skips the Account Selection screen, applies the filter on the backend, and includes the IDs in the REDIRECT event and redirect URL, bringing Reconnect to parity with the initial-session contract for accountSelectorEnable and accountSelectorMultiple.
This parameter applies to Reconnect sessions only. It has no effect on initial sessions. To resume a session with previously selected accounts, pass them as a comma-separated list:
Url Example
RESUME_SELECTED_ACCOUNTS_INVALID event is emitted with the attempted IDs.
End-to-end example: filter to a selected account
This example ties the Account Selection front end to the API back end, so you retrieve data for only the account your end user picked.1
Let the user select an account in Flinks Connect
Launch the iframe with
accountSelectorEnable=true. After authorization, the end user picks an account and you capture both the loginId and the selected accountId from the redirect URL (or the ACCOUNT_SELECTED event):Shell
Redirect URL
2
Exchange the loginId for a requestId
Call /Authorize with your instance,
customerId, and the captured loginId to obtain a requestId.3
Retrieve only the selected account
Call /GetAccountsDetail with the
requestId. By default, Flinks Connect only collected the selected account, so the response is already filtered. To be explicit, or when you used fetchAllAccounts=true, pass the captured accountId(s) in the AccountsFilter array:Json
Range of transactions
By default, Flinks Connect extracts Transactions history data for the last 90 days. It is possible to increase the range to a full year, or configure it to avoid extracting transactions altogether.
To increase the range to a full year, you need to specify the parameter
daysOfTransactions=Days365. If you do not need to collect the transaction history, specify the parameter withTransactions=false.
Bank issued PDF statements
For setting a connection to additionally extract bank-issued monthly PDF statements file, the parameter
detailsAndStatementEnable=true is required. When enabled by default, the last 3 months of statements will be extracted. However, up to 12 months of statements can be retrieved by using the parameter monthsOfStatements.
We will unlock that for you
If you want to use this feature, please contact our support so we can enable it in your private instance.Nightly refreshes (Deprecated)
Tag
Custom tags let you attach your own reference data to a connection request so you can reconcile Flinks
loginIds with records on your side: for example, an internal user ID, a campaign name, or a workflow reference.
To set a tag, pass the tag parameter in your Flinks Connect iframe URL:
Url Example
MaximumRetry
By default, Flinks Connect doesn’t limit the number of times the end user can attempt to enter their login credentials. You can limit these attempts in order to prevent your end user from being locked out of their account for entering the wrong credentials too many times. Specify the maximum number of attempts by using the parameter
maximumRetry.
Stringify
If you need to have all your events from the Event Listener as strings instead of JSON, specify the parameter
stringify=true.
Inputs
By default, Flinks Connect allows auto-complete functionality on input fields. As well, Flinks Connect will automatically focus input fields that require user action. If either of these behaviours causes issues in your app, they can be disabled by using
preventAutoFocus=true and preventAutoFill=true.
Webview
When set to
true, Flinks Connect emits events through window.ReactNativeWebView.postMessage instead of window.postMessage. Use this parameter when loading Flinks Connect inside a native mobile WebView (iOS, Android, or React Native). For detailed setup instructions, see Mobile Integration.
Institution filter
When enabled, displays a search/filter bar on the institution selection screen, allowing users to quickly find their financial institution by name. This is recommended when your integration supports a large number of institutions.
Flinks Upload
Flinks Upload is a feature that you can enable in Flinks Connect to process and extract data from a bank statement or void cheque. By default, Flinks Connect displays a title and subtitle on the upload screen: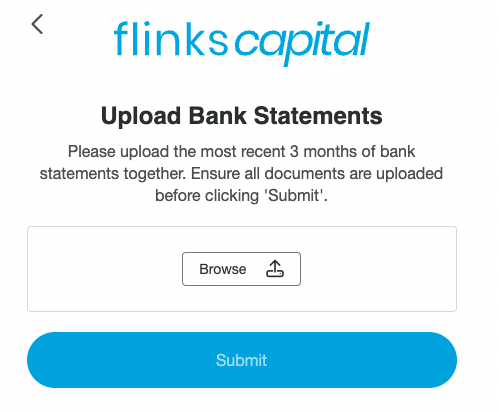
For more information about the types of files you can upload and what this feature supports, see What can I upload?.
This feature must be switched on
To start using Flinks Upload, contact your Flinks Representative, and we will enable it for you.Enable full page redirects
This parameter is useful if you’re loading Flinks Connect as the top-level window (or in web view) and are noticing that the iframe is blocking pop-ups. Use theoauthWindowRedirect=true parameter to enable a full page redirect rather than relying on pop-up behaviour.
If Flinks Connect is loading inside an iframe, passing this parameter will not work.